
“Entitled Squatter Learning Her Lesson the Hard Way” refers to a popular viral video, often shared on platforms like YouTube and Facebook, showing a confrontation where a woman, perceived as an entitled squatter, refuses to leave a property and is forcibly removed by authorities, highlighting a real-life situation where someone learned the consequences of unlawfully occupying someone else’s home. The video’s title reflects public sentiment that the woman was demanding rights she didn’t have, leading to her “lesson” being learned “the hard way” through legal enforcement.
Key aspects of the story:
- The Situation: A person (the “squatter”) was occupying a property without permission.
- The Conflict: The homeowner or authorities tried to get her to leave, but she resisted, claiming some form of entitlement.
- The “Lesson”: Law enforcement intervened, leading to her forceful eviction, which many viewers saw as a necessary consequence for her actions.
- Viral Nature: The video gained traction online due to the dramatic confrontation and the perceived injustice of the squatter’s behavior.
Module 1: Science – Looking at Life
Section 1 : Classifying living things
Key Focus Question: How can you help pupils organise their observations of living things?
Keywords: classify; model; life cycle; animals; plants; research; group work
Learning outcomes
By the end of this section, you will have:
- collected and displayed real items in a logical way in your classroom to support your pupils’ learning about grouping living things;
- used model building as a way of recording what your pupils know about different plants and animals;
- organised your pupils into pairs or small groups to undertake independent research projects on different life cycles.
Introduction
Pupils need to grow up respecting and caring for our natural world; ideally, we all need to be naturalists. A naturalist is interested, observant, curious and values nature – someone who is learning about and caring for their world all the time. They have a clear, ‘big’ picture in their mind of how things work in nature. New observations will find a place in their big picture.
How do teachers help pupils achieve this big picture of how nature works? This section explores how you can help pupils organise and extend their knowledge about living things. You will bring real items into your classroom, organise displays, make models and undertake research with your pupils.
1. Classifying living things
When we find out something new, we fit it in amongst all the things we already know. We build up our own big picture (organising system) in our heads. That’s how the human mind works.
Think about how we organise our ideas of a family. We can represent this in a diagram called a family tree, where you place people where they belong in the big picture. Resource 1: An African family tree shows a typical family tree. You might like to create your own family tree to share with your pupils, or that of a famous person.
This is how it is with biology. As a teacher, you need to help your pupils to build up a useful big picture of living things and how they are related. There is an agreed organising system that scientists have developed over years. Resource 2: The current agreed classification of living things shows how biologists organise living things into kingdoms and some of their subdivisions.
A good way to start helping pupils organise their ideas about living things is to begin with items in your own environment – objects that pupils are familiar with and can easily investigate. Case Study 1 shows how one teacher did this with her class and Activity 1 shows how to make a display in your own classroom. If your pupils can start to classify (sort) these items into groups, they will be behaving as scientists.
Case Study 1: The big picture of living things
Amaka Ukwu’s pupils in Nguru, Nigeria, were surprised to find two new tables in the class. Without saying anything, Ms Ukwu carefully laid out four self-standing cards in specific positions on the tables. ‘Non-living’ on the table to the left and ‘Living’, ‘Plants’ and ‘Animals’ on the table to the right.
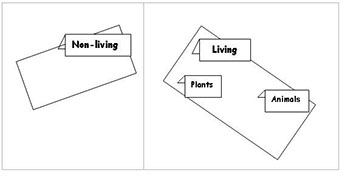
Ms Ukwu gave the class five minutes to go outside and find different examples of non-living things. She talked about what they brought back and helped them to group similar things together on the non-living table. Ms Ukwu deliberately checked that things like bone, wood, cardboard and paper were on the side nearer to the living tables. Why did she do that?
Next, each pupil was given a small self-standing card and asked to draw any plant or animal on one side and write its name on the back. It must be different from anyone else’s. The cards were brought to the front and sorted, displayed and discussed. Ms Ukwu ensured that like was sorted with like. (She had in mind the organising diagram from Resource 2 but chose not to confuse her pupils by telling too much too soon.)
Ms Ukwu completed the lesson by asking the pupils to look at all the non-living things and divide them into those that were once living and those that were never alive. The pupils worked in groups and had lively discussions about many of the exhibits.
Activity 1: Collecting evidence of life around us
Tell your pupils that they will be developing a display to show non-living and living things around them. Explain that it would not be right to display real animals and plants. They should not damage or kill anything living. Instead, rather like detectives, they should hunt for clues and evidence of any living thing – for example, feathers, droppings, leaves and seeds. Give pupils several days to bring in things for the display. Now talk about the groupings you will have (animals, plants and so on), what defines each group and where each item sits in the display. Pupils could then make labels for the display.
In the next science lesson, choose six things from the display – three living and three non-living – and display them on another table.
Gather your pupils round the table and ask them which of the six things are living and how they know this. By careful questioning and discussion you should be able to draw up a list of the seven characteristics of living things. Resource 3: The seven common characteristics of all living things gives you ideas for this work on the characteristics of plants and animals.
2. Making models in groups
Mathematics deals with patterns, so does art, and even in language there are patterns and structures. Thinking scientifically also involves looking for basic patterns. Think of your hands and feet. They have the same basic plan. They are joined to a limb by a joint (wrist/ankle), there is a flat part (palm/sole) and there are five jointed digits (fingers/toes) with hard nails on the upper tip.
Scientists group things by similarities and differences in the basic patterns of their structure or form.
Pupils will enjoy looking for basic patterns in the plants and animals they know and find. One way to find out what your pupils observe about patterns in plants and animals is by asking them to make models. Talking about their models will help them make more detailed observations of the living things.
In Case Study 2 pupils showed their teacher what they knew about plants by building models. This gave a starting point for developing their skills of observing and understanding plants. Activity 2 guides you through a similar exercise that is appropriate for your curriculum.
Case Study 2: Models of plants
At a teacher education session, teachers worked to plan more practical, hands-on science lessons that would help them see what children already knew and could do.
They explored the use of model making as a way to assess what children knew about something like the structure of plants. Then, after comparing each other’s models and observing real plants more carefully, the pupils could choose to improve their old models, or make new ones to show new learning.
One of the teachers, Okoro Mohammed, demonstrated how she had used a cardboard box of scrap material (cloth, cardboard, paper, plastic, old tights, elastic bands, used containers etc.) as a resource for children to build models to show what they already knew about plants. She explained how much more detail the children had taught themselves after comparing each other’s work and going out to observe plants more carefully. They included bark and buds, and finer details like leaf veins, or specific patterns of branch formation. Improving their models seemed to give the pupils a real reason to sharpen their observation and extend their understanding of plant structure.
See Resource 4: Plant models for more detail on how to carry out this activity.
Activity 2: Making models of animals
In many parts of Nigeria, entrepreneurs make a living by selling lifelike models of animals. We feel that all pupils are entitled to the chance to extend this natural desire to make models to extend their study of different animals. By asking children to make models, you will also be integrating science with technology and art.
You can add to the classroom displays set up in Activity 1 by getting children to work at making models of different types of local animals like chickens, dogs or cows using appropriate materials. (See Resource 5: Pupils’ models of animals for examples and suggestions.)
We suggest you organise the pupils to work in groups, three or four pupils in each group usually works well. (See Key Resource: Using group work in your classroom to help you decide how you will organise the groups.) You could organise your groups by mixing lower and higher achievers.
Encourage pupils to bring in materials for their models. As they are building the models, move around the classroom, talking to the groups; with younger pupils ask them to name the parts of the animal they are modelling – paws, tails, ears and so on. With older pupils, ask questions about the shapes and functions of the different parts of the animals – how do they help the animal move? eat? keep warm? cool down? sense that predators are near?
Think about how you could encourage your pupils to reflect on their work. Could you ask different groups to comment on the other groups’ models? Make sure you allow time for pupils to talk about their work and to improve it.
Did this activity work well?
Were you surprised by the detail of the pupils’ models?
Is the detail of the pupils’ models accurate?
What could be improved?
Did it help pupils to see similarities and differences between animals?
3. Organising project work
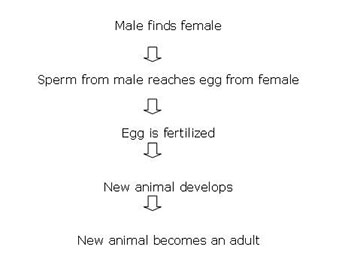
In this section we have been exploring patterns in living things. There is a basic pattern to the life cycle of all living things. There is fertilisation and development of an embryo in a seed/egg/womb. Then there is a process of birth/hatching/germination. Next comes feeding and growth through a number of stages. At maturity, the final stage of reproduction can take place and the cycle begins again.
In Case Study 3 teachers use story wheels to help pupils understand this pattern in life cycles.
Story wheels are useful tools to use because they:
- show the stages in the life cycle of the plant or animal;
- help pupils to organise their ideas about life cycles;
- help pupils to move from the known to the unknown – from the pictures to the labels with the scientific terms.
Read the case study for more detail about how story wheels can be used with pupils.
You might like to try story wheels with your classes; there are some labels and pictures to help you in Resource 6: Story wheel of the life cycle of the bean.
All types of living things have their own distinctly different life cycle pattern. It is interesting for pupils to find out how different living things have adapted their own life cycles. Having discussed the basic life cycle pattern in class, and perhaps done some plant story wheels, your pupils will be ready to do some research projects of their own on life cycles in the Key Activity. This activity builds on pupils’ observations of living things in their environment. Pupils take responsibility for planning, doing, reporting and assessing their own learning on their chosen animal. At the end of the activity, it is important to look at all the life cycles and discuss how they all have the same basic pattern.
You might like to look at the Key Resource: Researching in the classroom to help you plan this activity.
Case Study 3: Plant life cycle patterns
Mrs Aderinto gathered her class round her, held up a green bean pod and told the story of the life cycle of the bean. She used the words seedling, germination, growing and adult plant so that her pupils learned the correct words.
Then she divided her class into four groups: Groups 1 and 2 each had three pictures showing one of the stages in the bean’s life cycle, Group 3 had the rectangular labels (describing the pictures) and Group 4 had the round labels (describing the steps in the life cycle story). Resource 6 shows these labels and pictures.
Mrs Aderinto then drew a large circle on the board and divided it into six equal parts. She asked the group with the first picture to come and put it in the story wheel. She then asked what came next and asked the pupils to put in the next picture. When each part of the wheel contained a picture, she asked Group 3 to add their labels. Finally, Group 4 placed their labels in sequence on the story wheel and explained the steps to the class. She finished by asking pupils to copy the story wheel and explain in their own words the story of the bean’s life cycle – they could start anywhere on the cycle.
Mrs Aderinto found this lesson worked really well with her pupils and they wanted to do story wheels for other plants and animals.
Key Activity: Animal life cycle projects
- Organise your class into groups of three or four.
- With your pupils, make a long list of animals that can be found in your local environment. Write this list on the board or on a large piece of paper stuck to the wall.
- Ask each group to choose an animal from the list; try to ensure that no two groups choose the same animal. Suggestions include: grasshopper, butterfly, frog, turtle, mosquito, beetle, elephant, bird and fish.
- Give the class some basic guidelines for the work on life cycles; how long they have, what you expect from them and how they should display their work. For younger pupils, you would expect them to give you three/four pictures in the story wheel shape and to put some basic labels on the pictures such as egg, chick, adult, baby and to have the pictures in the correct order. Older pupils should be able to discover something about each of these five stages:
They should draw detailed diagrams with clear labels and notes. They should include the number of babies born together, the time for each stage and how the animal gets its food at each stage. You will need to guide them so that they can work fairly independently with confidence. One way to help the pupils is to have a list of useful words on the classroom wall; they can then feel confident about spelling these words.
- Encourage each group to start by recording what they already know about their animal. Then they should find out more by investigation, research and observation. Pupils might want to ask people in the community or to use books or the Internet (see Key Resource: Using new technologies) if you have access to these.
Working in this way, your pupils will really be thinking and acting scientifically. Did your pupils seem interested in this activity? What do you think they learned?
Resource 1 : An African family tree
![]() Teacher resource for planning or adapting to use with pupils
Teacher resource for planning or adapting to use with pupils
This resource shows the family tree of the Yabani Akinrinlola family.
Resource 2 : The current agreed classification of living things
![]() Teacher resource for planning or adapting to use with pupils
Teacher resource for planning or adapting to use with pupils
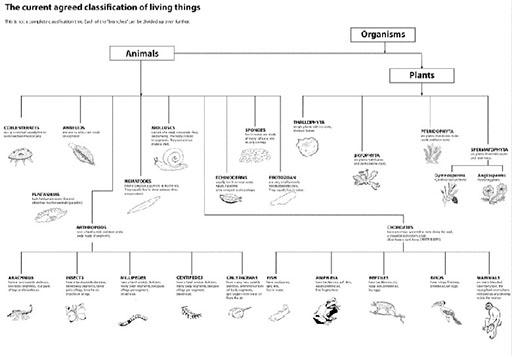
Original source: Active Science 1, Coles, Gott and Thornley, Collins Educational
Resource 3: The seven common characteristics of all living things
![]() Background information / subject knowledge for teacher
Background information / subject knowledge for teacher
When asked to think of the characteristics of all living things, most young children relate it to themselves and include things like needing to sleep, needing to keep clean, all die, need air, need to eat, all grow, all can be hurt or damaged, need friends, etc.
Accept and praise all their answers before you explain to them that scientists have come to agreement that the seven things that all living things have in common are the following:
- Nutrition
- Reproduction
- Growth
- Respiration
- Sensitivity
- Movement
- Excretion
We suggest you discuss each characteristic in turn with pupils. It is useful to clarify that the same basic things happen in plants and in animals but slightly differently. For example, with nutrition, plants manufacture their own food, whereas animals are dependent on eating plants or other animals. A further example is that more plants than animals can reproduce both asexually (without mating) as well as sexually (requiring pollination). It is only some of the more simple animals that can split into two or bud off new offspring; otherwise sperm and eggs are involved. But with both eggs and seeds there is an embryo that develops and germinates/hatches or is born. Let the children’s interest and questions guide the discussion about each characteristic.
A good activity is to try to find evidence of these characteristics. For example, a leaf that shows evidence of having been eaten by some insect, or the owl pellets of skin, fur and bone found under a tree where an owl roosts (nutrition). Tracks, trails and ripples in water are evidence of animals moving (movement). Flowers that follow the sun, like sunflowers, or others that close/open at night, is evidence of plant movement. Then, clothes that no longer fit, shed skins of insect larvae and tree roots that crack paving are evidence of growth. Write each characteristic on the chalkboard and let pupils add notes or drawings to explain evidence they have found.
Resource 4: Plant models
![]() Teacher resource for planning or adapting to use with pupils
Teacher resource for planning or adapting to use with pupils
Before this activity, ask your pupils to bring in scrap materials. Collect some yourself. Scrap materials might include: tin; cardboard; string; tape; straws; plastic bottles; fabric; paper; netting; wire.
Step 1: Divide your class into small groups of three or four pupils. Write the following instructions on the chalkboard or give each group an instruction card:
| Talk about what a plant looks like.Then make models of the plants from the scrap materials. |
Step 2: Organise the scrap materials so that each group has a selection to use.
Step 3: Give your pupils time to plan and build their models.
Step 4: Ask each group to come to the front in turn and explain their model to the class.
How the lesson went for Okoro
The plant models that the pupils made showed that they knew the basic structure of a plant, but they were not too sure of the details, like bark, side branches and where the leaves are on branches.
She decided to let them look at plants outside and then return to their models and change or add to them. Her pupils had some knowledge of the terminology but not enough in English or their mother tongue, so they used a mixture of both. There were some plant parts they did not know the names of in either language.
To help pupils, she developed a lexicon (a small dictionary) to show which words the pupils knew to describe the parts of plants that they were familiar with:
(You might find it helpful to put up these words round your classroom and encourage the pupils to use them when talking about their models).
| Lexicon of plant terms | |
| Simple terms | More advanced terms for older pupils |
| * root | tap root,side root |
| * stem | bark |
| * leaf | vein |
| * bud | |
| * flower | petal, anther, pollen, ovule |
| * fruit | fleshy,dry,case |
| seed | radicle (baby root)plumule (baby shoot)cotyledon (food store) |
Adapted from: Primary Science Programme – Teaching the Topic Plants
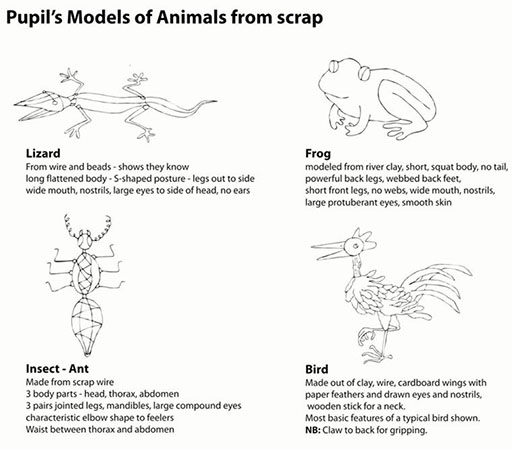
Resource 5: Pupils’ models of animals from scrap
![]() Example of pupils’ work
Example of pupils’ work
Resource 6: Story wheel of the life cycle of the bean
![]() Teacher resource for planning or adapting to use with pupils
Teacher resource for planning or adapting to use with pupils
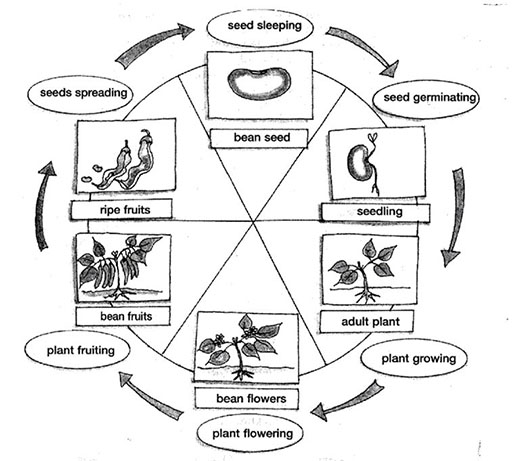
| The story wheel is a useful tool because it:shows the stages in the life cycle of plants;helps the pupils work from the known to the unknown, that is, from the children’s stories to the pictures to the labels;provides the pupils with an organising diagram summarising the life cycle of any plant;shows the logical sequence of the stages in the life cycle.It also shows the pupils that they can start the story at any place in the wheel and follow it through all the stages. |
The various stages of the story wheel have been mixed up on the worksheet below. Ask the pupils to cut them out and arrange them in the correct places to test their understanding.
Adapted from: Primary Science Programme – Teaching the Topic Plants
Acknowledgements
Grateful acknowledgement is made to the following sources:
Photographs and images
Classification of living things diagram: Active Science 1, Coles, Gott and Thornley, Collins Educational
Story wheel of the life cycle of the bean diagram: Adapted from Primary Science Programme – Teaching the Topic Plants
Text
Lexicon of plant terms: Adapted from Primary Science Programme – Teaching the Topic Plants
Every effort has been made to contact copyright holders. If any have been inadvertently overlooked the publishers will be pleased to make the necessary arrangements at the first opportunity.
Section 2 : A closer look at plants
Key Focus Question: How can you help pupils ask investigate plants in the local environment?
Keywords: plants; reproduction; flowers; project; nature trail; values
Learning outcomes
By the end of this section, you will have:
- explored how to help pupils ask questions, observe and make deductions to develop their knowledge of local plants;
- worked with pupils to develop positive attitudes to how the local habitat is valued and cared for;
- planned and carried out a class project to develop a local nature trail.
Introduction
How many species of plant grow in your local environment? How many can you and your pupils recognise?
In this section, you work with your pupils to establish and consolidate what they know about plants. This is your starting point for introducing new knowledge. The new knowledge will then be more likely to make sense to them and be more meaningful. The emphasis throughout this section is on practical activities, encouraging pupils to explore, observe carefully and investigate their own environment. This includes planning a nature trail with your pupils. This work will help them develop a positive attitude to their local environment, valuing and caring for the different species.
1. Encouraging pupil questions
What makes plants so special? Two things. Almost all plants make their own food from water and a common gas in the air – carbon dioxide. The special green pigment, chlorophyll, traps the energy of sunlight, forming energy-rich carbohydrate. At the same time, plants release oxygen. People and animals would not exist if it were not for plants. This is why we should take plants more seriously!
A good starting point for exploring plants is to look at some of the simpler non-flowering plants. Simple plants do not have flowers, pollen or seeds; they reproduce in different ways. This group of plants includes mosses, ferns and lichen. Resource 1: Looking at plants has more information about these simple plants.
Do you have examples of these in your local environment?
On your usual walks, try to find examples of these different plants; this will give you ideas for questions to raise with your pupils. You could collect some to bring into your class.
Case Study 1 shows how one teacher encouraged his pupils to observe these simple plants and Activity 1 shows how you can support your pupils to ask their own questions about them.
Case Study 1: Local simple plants
Mr Karume and his class in Tanzania walked round the area near their school, hunting for examples of simple plants. They found tiny mosses, green tufts growing on the bark of the shady side of tree trunks and rocks. They looked at lichen, which grew on the bark of the sunny side of tree trunks and rocks and even roofing. They found small ferns growing in cracks in the wall near the rainwater tank. They drew each plant and noted where it was growing.
When they were back in the classroom, Mr Karume asked his pupils to think about how these plants were able to reproduce. He displayed all their ideas on newsprint round the classroom.
To find out more, the pupils collected some moss and grew it under the bottom half of a clear plastic bottle. After a time, they noticed that the moss produced green, club-shaped capsules that turned brown and split, releasing tiny spores. They discussed whether these would grow into new moss.
The pupils then went back to observe the ferns and the lichen. They discovered that all the ferns had patches of scaly brownish spore capsules on the undersides. They kept observing the lichens, but saw no spore production. Mr Karume asked a local high school biology teacher to tell them more about lichen and how it reproduces. He was very pleased with how these activities had increased his pupils’ awareness of these plants.
Activity 1: Asking questions
Freshwater algae are plants that make food and give off oxygen. Grow some algae in the classroom by letting some water turn green in a clear open glass (or collect some algae locally).
- Encourage pupils, working in small groups, to think of questions to ask about the algae. What would they like to know about it? Remind your pupils of the seven characteristics of living things. Does it need light to grow? Where does it come from? Why is it important? Each group of pupils should record each question on a piece of paper or newsprint.
- Ask each group in turn to share their questions. Display the questions in suitable clusters on the classroom wall and discuss them. Which questions could you investigate? Which do you need to look up in a book or ask an expert or use the Internet? Which might be very difficult to answer?
If you have time, ask the groups to carry out investigations (see Key Resource: Using investigations in the classroom) and do research to answer some of the questions.
2. Observing plants
An important part of thinking scientifically is looking for patterns and organising observations. You and your pupils have been looking at simple plants, which reproduce without flowers, pollen or seeds. But most plants today, from the tiniest grass plants (grass has very inconspicuous flowers) to the tallest of woody trees, have flowers that make pollen and produce seeds carried in a closed ovary. (See Resource 2: Reproduction in flowering plants for more information.)
In Activity 2 you work with pupils to find out the common features of flowering plants and try to solve a problem – how does each plant pollinate? In this type of activity your pupils will be involved in speculating, sharing and reforming their ideas. It is important that you and other pupils listen carefully to everyone’s ideas and do not dismiss what anyone says. The discussion should challenge the ideas, not the person – otherwise pupils will not be happy to do this kind of activity.
Following the activity, you might want to start a checklist of local flowering plants. You could use scrapbooks to keep the information for future reference, as well as drawings and pressed dried specimens. Other pupils in the school and parents may enjoy looking at these scrapbooks and adding their own comments.
Case Study 2 shows how one teacher encouraged her pupils to think about our dependence on plants and to find out about the different plants being used in the local area.
Case Study 2: Plants used as barriers
Mrs Ollenu set her class an activity for the holidays. She asked them to report back on the number of examples they could find of plants (alive or dead) being used to form a protective barrier in some way. A barrier keeps things in or out of a place. She told them they could also interview older people to discover what happened in the past, or find photographs in old magazines or newspapers.
The next term, pupils reported back on what they had found out. Mrs Ollenu was delighted with their findings and the class were very surprised at the number of different examples. They didn’t just have examples of hedges and wooden fences; they also had windbreaks, creepers grown over structures to provide shade, cane screens and cotton cloth curtains. Mrs Ollenu gathered their ideas on a large poster on the classroom wall. Some pupils had brought in drawings, so this was a very colourful and informative display.
She used this display as the starting point for a class debate on the advantages and disadvantages of plants as barriers.
Activity 2: Structure of flowers
- Organise your class into pairs, or into groups of four if you have a large class. Ask each pair or group to find a flower that grows in your local area.
- Now ask each pair to find out everything they can about the structure and function of their chosen flower. (See Resource 2 for more information on flower reproduction.)
- Use the following instructions and questions as a guide with your pupils:
- Draw the structure of the flower.
- Label the parts of the flower. (To help them do this, you could put up a large drawing of a flower with the labels you want them to use on the chalkboard.)
- Describe the function of each part.
- How is the plant pollinated: Do insects visit the plant? Does the pollen hang on stamens outside the flower? Is it in a windy place?
- When each pair or group is ready, they could give an oral presentation to the class covering the points above.
